
Learn Loops in JavaScript
Learning how to repeat tasks is one of the most important steps in becoming comfortable with JavaScript. In real-world programming, you will often need to process a list of users, display products, calculate totals, search through data, or repeat an operation until a certain condition is met.
This is where loops in JavaScript become essential.
Instead of writing the same code again and again, you can use a loop to execute a block of code multiple times. JavaScript provides several types of loops, including for, while, do...while, for...of, and for...in.
In this guide, we will learn JavaScript loops from the basics to more practical examples, including when to use each type, common mistakes, and real-world situations.
Tip: Don't just read the examples. Open your browser's Developer Tools, create a JavaScript file, and type the examples yourself. Making small mistakes and fixing them is one of the fastest ways to understand loops.
What Is a Loop in JavaScript?
A loop is a programming structure that repeatedly executes a block of code while a specific condition is satisfied.
For example, suppose you want to print the numbers from 1 to 5.
Without a loop, you could write:
console.log(1);
console.log(2);
console.log(3);
console.log(4);
console.log(5);
This works, but it quickly becomes inconvenient.
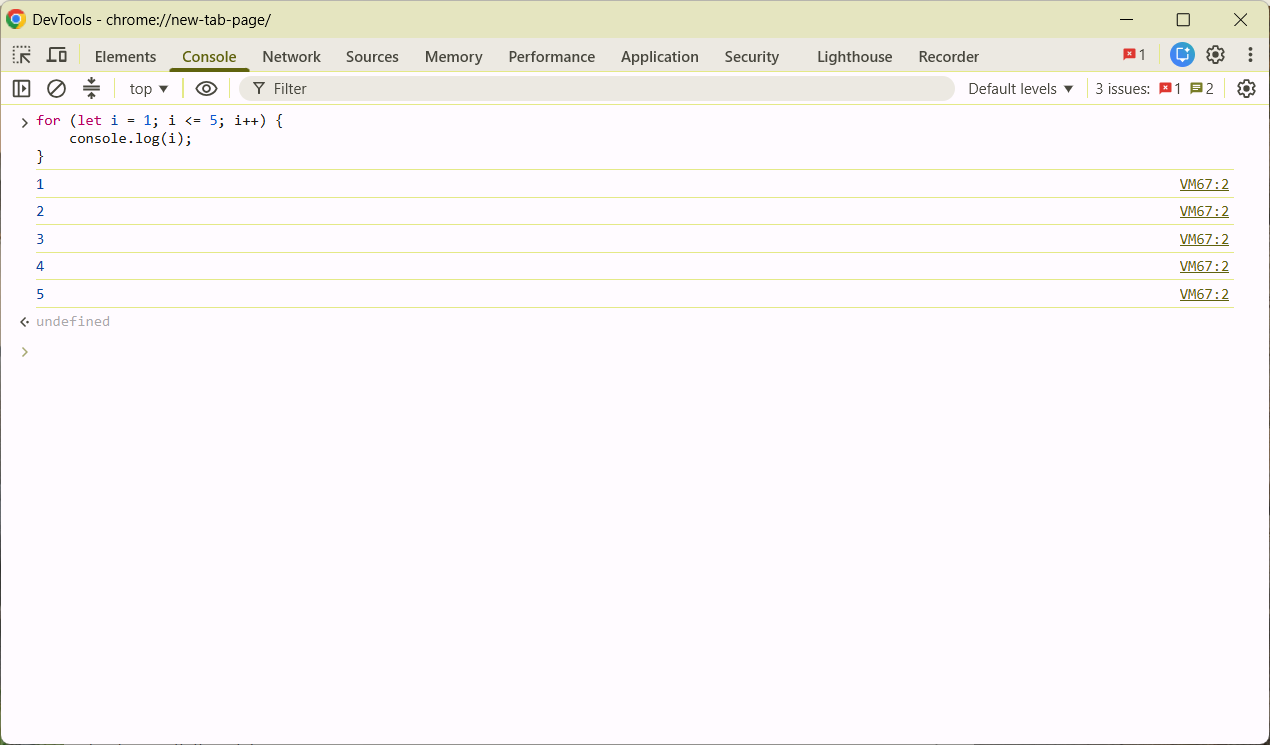
With a loop:
for (let i = 1; i <= 5; i++) {
    console.log(i);
}
The result is:
1
2
3
4
5
The advantage is obvious: you write the logic once, and JavaScript repeats it for you.
This becomes especially useful when you are working with large collections of data.
Why Are Loops Important in JavaScript?
Loops are used in almost every type of JavaScript application.
You might use a loop to:
Display a list of products
Process users returned by an API
Calculate the total of a shopping cart
Search for a specific item
Generate HTML elements
Process form fields
Read JSON data
Validate multiple values
Iterate through object properties
Work with arrays
Process database results
Generate reports or tables
For example, an e-commerce application might receive this data from an API:
const products = [
    {
        name: "Laptop",
        price: 1200
    },
    {
        name: "Keyboard",
        price: 80
    },
    {
        name: "Mouse",
        price: 40
    }
];
You can use a loop to display the products:
for (const product of products) {
    console.log(`${product.name}: $${product.price}`);
}
Output:
Laptop: $1200
Keyboard: $80
Mouse: $40
This type of operation is extremely common in real-world applications.
Understanding the JavaScript for Loop
The for loop is probably the first loop you should learn.
Its basic syntax is:
for (initialization; condition; update) {
    // code to execute
}
Here is a simple example:
for (let i = 0; i < 5; i++) {
    console.log(i);
}
The output is:
0
1
2
3
4
There are three important parts in this loop.
Initialization
The first part creates and initializes the counter:
let i = 0;The loop starts with i equal to 0.
Condition
The second part determines whether the loop should continue:
i < 5JavaScript checks this condition before every iteration.
As long as the condition is true, the loop continues.
Update
The final part changes the counter:
i++This increases i by one after every iteration.
So the loop behaves approximately like this:
i = 0 → print 0
i = 1 → print 1
i = 2 → print 2
i = 3 → print 3
i = 4 → print 4
i = 5 → stop
Understanding these three parts will make the for loop much easier to use.
Looping Through an Array With for
Arrays are one of the most common places where you will use loops.
Consider this array:
const fruits = [
    "Apple",
    "Banana",
    "Orange",
    "Mango"
];
You can loop through it like this:
for (let i = 0; i < fruits.length; i++) {
    console.log(fruits[i]);
}
The output is:
Apple
Banana
Orange
Mango
The important part here is:
fruits.lengthThe length property tells us how many elements are inside the array.
For this array:
fruits.lengthreturns:
4JavaScript arrays start at index 0, so the indexes are:
0 → Apple
1 → Banana
2 → Orange
3 → Mango
This is why the condition normally uses:
i < fruits.lengthrather than:
i <= fruits.lengthCounting Backwards With a for Loop
A for loop doesn't have to count upward.
You can also count backwards:
for (let i = 10; i >= 0; i--) {
    console.log(i);
}
The output is:
10
9
8
7
6
5
4
3
2
1
0
This technique is useful for countdowns and situations where you need to process data in reverse order.
You can also increment by more than one:
for (let i = 0; i <= 20; i += 2) {
    console.log(i);
}
Output:
0
2
4
6
8
10
12
14
16
18
20
The while Loop
The while loop is another fundamental JavaScript loop.
Its syntax is:
while (condition) {
    // code
}
For example:
let i = 0;

while (i < 5) {
    console.log(i);
    i++;
}
Output:
0
1
2
3
4
The main difference from a for loop is how the loop is structured.
With a for loop, initialization, condition, and update are usually written together:
for (let i = 0; i < 5; i++) {
    console.log(i);
}
With a while loop, they are separated:
let i = 0;

while (i < 5) {
    console.log(i);
    i++;
}
Both approaches are valid.
When Should You Use a while Loop?
A while loop can be useful when you don't know exactly how many times the loop needs to execute.
For example:
let attempts = 0;

while (attempts < 3) {
    console.log("Checking...");
    attempts++;
}
The loop runs until the condition becomes false.
Another example:
let number = 1;

while (number < 100) {
    number *= 2;
}

console.log(number);
Here, the exact number of iterations depends on how quickly the value reaches 100.
Avoiding Infinite Loops
One of the most common mistakes beginners make is creating an infinite loop.
For example:
let i = 0;

while (i < 5) {
    console.log(i);
}
The problem is that i never changes.
Therefore:
i < 5will always be true.
The correct version is:
let i = 0;

while (i < 5) {
    console.log(i);
    i++;
}
Whenever you write a while loop, always think about this question:
What will eventually make the condition false?
That simple question can save you from a lot of debugging.
The do...while Loop
JavaScript also provides the do...while loop.
Its syntax is:
do {
    // code
} while (condition);
For example:
let i = 0;

do {
    console.log(i);
    i++;
} while (i < 5);
Output:
0
1
2
3
4
The important difference between while and do...while is that a do...while loop always executes its code at least once.
Consider:
let number = 10;

do {
    console.log(number);
} while (number < 5);
Even though:
number < 5is false, JavaScript still prints:
10That's because the code inside do runs before JavaScript checks the condition.
while vs do...while
With while:
let number = 10;

while (number < 5) {
    console.log(number);
}
Nothing is printed.
With do...while:
let number = 10;

do {
    console.log(number);
} while (number < 5);
The output is:
10This difference is useful when an operation must happen at least once.
The for...of Loop
Modern JavaScript provides a very convenient way to iterate over values using for...of.
For example:
const fruits = [
    "Apple",
    "Banana",
    "Orange",
    "Mango"
];

for (const fruit of fruits) {
    console.log(fruit);
}
Output:
Apple
Banana
Orange
Mango
Compare this with a traditional for loop:
for (let i = 0; i < fruits.length; i++) {
    console.log(fruits[i]);
}
The for...of version is often easier to read:
for (const fruit of fruits) {
    console.log(fruit);
}
It basically says:
For each fruit in the fruits collection, do something.
That makes the intention of the code very clear.
Using for...of With Strings
You can also use for...of with strings.
const word = "JavaScript";

for (const character of word) {
    console.log(character);
}
Output:
J
a
v
a
S
c
r
i
p
t
This can be useful when you need to process individual characters.
The for...in Loop
The for...in loop is generally used to iterate over the property keys of an object.
For example:
const user = {
    name: "Hassan",
    age: 24,
    country: "Morocco"
};

for (const key in user) {
    console.log(key);
}
Output:
name
age
country
You can use the key to access its value:
for (const key in user) {
    console.log(key, user[key]);
}
Output:
name Hassan
age 24
country Morocco
for...of vs for...in
This is an important distinction for JavaScript beginners.
Use for...of when you want the values:
const numbers = [10, 20, 30];

for (const number of numbers) {
    console.log(number);
}
Output:
10
20
30
Use for...in when you want the property keys:
const user = {
    name: "Sara",
    age: 25
};

for (const key in user) {
    console.log(key);
}
Output:
name
age
A simple way to remember the difference is:
for...of→ valuesfor...in→ keys
This distinction becomes especially important when working with arrays and objects.
Using break to Stop a Loop
Sometimes you don't need a loop to continue until its normal condition becomes false.
For example, imagine that you're searching for a particular user.
You can use break to stop the loop as soon as you find what you're looking for.
const users = [
    "Ahmed",
    "Sara",
    "Omar",
    "Youssef",
    "Fatima"
];

for (const user of users) {
    console.log(`Checking ${user}`);

    if (user === "Omar") {
        console.log("User found!");
        break;
    }
}
Once "Omar" is found, the loop stops.
There is no reason to continue checking the remaining users.
Using continue to Skip an Iteration
The continue statement does almost the opposite of break.
Instead of stopping the entire loop, it skips the current iteration and moves to the next one.
For example:
for (let i = 1; i <= 10; i++) {
    if (i === 5) {
        continue;
    }

    console.log(i);
}
Output:
1
2
3
4
6
7
8
9
10
The number 5 is skipped.
A practical example would be processing only positive numbers:
const numbers = [10, -5, 20, -3, 30];

for (const number of numbers) {
    if (number < 0) {
        continue;
    }

    console.log(number);
}
Output:
10
20
30
Nested Loops
A loop can contain another loop. This is called a nested loop.
For example:
for (let i = 1; i <= 3; i++) {
    for (let j = 1; j <= 3; j++) {
        console.log(`i=${i}, j=${j}`);
    }
}
Output:
i=1, j=1
i=1, j=2
i=1, j=3
i=2, j=1
i=2, j=2
i=2, j=3
i=3, j=1
i=3, j=2
i=3, j=3
Nested loops are useful for working with grids, tables, matrices, and combinations.
For example, you could create a multiplication table:
for (let i = 1; i <= 10; i++) {
    for (let j = 1; j <= 10; j++) {
        console.log(`${i} × ${j} = ${i * j}`);
    }
}
However, nested loops can become expensive when working with large datasets, so you should use them carefully.
Looping Through an Array of Objects
Real JavaScript applications often work with arrays containing objects.
For example:
const products = [
    {
        name: "Laptop",
        price: 1200
    },
    {
        name: "Keyboard",
        price: 80
    },
    {
        name: "Mouse",
        price: 40
    }
];
You can loop through the products using for...of:
for (const product of products) {
    console.log(`${product.name}: $${product.price}`);
}
Output:
Laptop: $1200
Keyboard: $80
Mouse: $40
This is a pattern you will see frequently when working with APIs.
An API might return a list of products, customers, orders, or articles, and your JavaScript code can loop through that data to display it.
Using Loops to Calculate a Total
Loops are also useful for calculations.
Suppose you have these prices:
const prices = [100, 250, 50, 75];

let total = 0;

for (const price of prices) {
    total += price;
}

console.log(total);
The result is:
475You can use the same idea for a shopping cart:
const cart = [
    {
        name: "Laptop",
        price: 1200,
        quantity: 1
    },
    {
        name: "Mouse",
        price: 40,
        quantity: 2
    }
];

let total = 0;

for (const item of cart) {
    total += item.price * item.quantity;
}

console.log(total);
The result is:
1280This is much closer to the kind of logic you might encounter in an actual e-commerce application.
Using Loops to Search for Data
Another common task is searching through an array.
Suppose you have these products:
const products = [
    {
        id: 1,
        name: "Laptop"
    },
    {
        id: 2,
        name: "Keyboard"
    },
    {
        id: 3,
        name: "Mouse"
    }
];
You can search for a product like this:
const productId = 2;

for (const product of products) {
    if (product.id === productId) {
        console.log("Product found:", product);
        break;
    }
}
Output:
Product found: { id: 2, name: "Keyboard" }The break statement prevents unnecessary iterations after the product has been found.
Using Loops to Calculate an Average
Let's say you have several grades:
const grades = [15, 17, 12, 18, 16];

let total = 0;

for (const grade of grades) {
    total += grade;
}

const average = total / grades.length;

console.log(`Average: ${average}`);
Output:
Average: 15.6This simple example demonstrates an important programming pattern:
Start with an initial value.
Process every item.
Update the value during each iteration.
Use the final result.
You will encounter this pattern frequently when working with data.
Using forEach()
JavaScript arrays provide a method called forEach().
For example:
const numbers = [1, 2, 3, 4, 5];

numbers.forEach((number) => {
    console.log(number);
});
Output:
1
2
3
4
5
forEach() executes the provided function once for each element.
For simple array iteration, it can be very readable.
For example:
const users = ["Ahmed", "Sara", "Omar"];

users.forEach((user) => {
    console.log(`Hello ${user}`);
});
Output:
Hello Ahmed
Hello Sara
Hello Omar
One important difference is that you cannot use break or continue directly inside forEach() to control the iteration.
If you need that kind of control, a for...of loop is often a better option.
Using map() Instead of a Traditional Loop
The map() method is another important JavaScript feature.
It is commonly used when you want to transform every item in an array.
For example:
const numbers = [1, 2, 3, 4, 5];

const doubled = numbers.map((number) => {
    return number * 2;
});

console.log(doubled);
Output:
[2, 4, 6, 8, 10]Notice that map() creates a new array.
Another example:
const names = [
    "ahmed",
    "sara",
    "omar"
];

const uppercaseNames = names.map((name) => {
    return name.toUpperCase();
});

console.log(uppercaseNames);
Output:
[
    "AHMED",
    "SARA",
    "OMAR"
]
When you understand traditional loops, methods such as map() become much easier to understand because you can see the underlying idea: process every item and produce a result.
Using filter() to Select Values
The filter() method is useful when you want to keep only certain values.
For example:
const numbers = [1, 2, 3, 4, 5, 6];

const evenNumbers = numbers.filter((number) => {
    return number % 2 === 0;
});

console.log(evenNumbers);
Output:
[2, 4, 6]You could accomplish the same task with a traditional loop:
const numbers = [1, 2, 3, 4, 5, 6];

const evenNumbers = [];

for (const number of numbers) {
    if (number % 2 === 0) {
        evenNumbers.push(number);
    }
}

console.log(evenNumbers);
Both approaches are useful.
The important thing is to understand what the code is doing rather than trying to memorize a particular syntax.
Using reduce() for Calculations
The reduce() method can be useful when you want to combine all values into a single result.
For example, you can calculate a total using a traditional loop:
const numbers = [10, 20, 30, 40];

let total = 0;

for (const number of numbers) {
    total += number;
}

console.log(total);
You can also use reduce():
const numbers = [10, 20, 30, 40];

const total = numbers.reduce((sum, number) => {
    return sum + number;
}, 0);

console.log(total);
Both produce:
100If you're still learning JavaScript, don't feel like you need to replace every loop with reduce().
First understand the basic loop.
Once you understand the logic, learning map(), filter(), and reduce() becomes much easier.
Loops and the DOM
Loops are also useful when working directly with HTML.
Suppose your page contains:
<ul id="user-list"></ul>You can create list items dynamically:
const users = [
    "Ahmed",
    "Sara",
    "Omar"
];

const list = document.querySelector("#user-list");

for (const user of users) {
    const li = document.createElement("li");

    li.textContent = user;

    list.appendChild(li);
}
The browser will create one <li> element for each user.
This is a basic example of how JavaScript can turn data into a dynamic user interface.
[Screenshot placeholder — Add a screenshot showing the generated list in the browser]
Loops in React
If you move from vanilla JavaScript to React, you will continue using the same concepts.
For example:
const users = [
    "Ahmed",
    "Sara",
    "Omar"
];
You can render them using map():
<ul>
    {users.map((user) => (
        <li key={user}>{user}</li>
    ))}
</ul>
The syntax is different from a traditional loop, but the fundamental idea is the same:
Take a collection of data and process every item.
Understanding JavaScript arrays, loops, and iteration will therefore make frontend frameworks such as React much easier to learn.
Loops and Asynchronous JavaScript
Modern JavaScript applications frequently communicate with APIs and other asynchronous services.
For example:
const userIds = [1, 2, 3];

for (const userId of userIds) {
    const response = await fetch(`/api/users/${userId}`);
    const user = await response.json();

    console.log(user);
}
Here, await causes each request to finish before the loop continues to the next iteration.
This can be useful when operations need to happen sequentially.
However, if the operations are independent, you may want to use tools such as Promise.all() to handle multiple asynchronous operations concurrently.
The important point is that loops don't disappear when you start working with asynchronous JavaScript. You simply need to understand how iteration interacts with promises and async/await.
Common JavaScript Loop Mistakes
Loops are easy to understand once you practice them, but beginners often encounter a few common problems.
Using the Wrong Condition
Consider:
for (let i = 0; i > 5; i++) {
    console.log(i);
}
This loop doesn't execute because:
0 > 5is false.
A typical correction would be:
for (let i = 0; i < 5; i++) {
    console.log(i);
}
Forgetting to Update the Counter
This is a classic infinite loop:
let i = 0;

while (i < 10) {
    console.log(i);
}
The value of i never changes.
Correct:
let i = 0;

while (i < 10) {
    console.log(i);
    i++;
}
Using <= Instead of <
Consider:
const users = ["Ahmed", "Sara", "Omar"];

for (let i = 0; i <= users.length; i++) {
    console.log(users[i]);
}
There are three elements, so the valid indexes are:
0
1
2
When i becomes 3, there is no element at users[3].
The usual solution is:
for (let i = 0; i < users.length; i++) {
    console.log(users[i]);
}
Confusing for...in With for...of
This code:
const fruits = ["Apple", "Banana", "Orange"];

for (const fruit in fruits) {
    console.log(fruit);
}
prints:
0
1
2
because for...in iterates over the property keys.
If you want the values:
for (const fruit of fruits) {
    console.log(fruit);
}
you get:
Apple
Banana
Orange
Choosing the Right Loop
There isn't one loop that is perfect for every situation.
The choice depends on what you are trying to accomplish.
Use for when you have a counter
for (let i = 0; i < 10; i++) {
    console.log(i);
}
This is useful when you know how the counter should behave.
Use while when the condition controls the repetition
while (condition) {
    // code
}
This can be useful when the number of iterations isn't known beforehand.
Use do...while when the code must run at least once
do {
    // code
} while (condition);
Use for...of when you want values
for (const item of items) {
    console.log(item);
}
Use for...in when you need object keys
for (const key in object) {
    console.log(key);
}
Use forEach() for straightforward array iteration
items.forEach((item) => {
    console.log(item);
});
Use map() when transforming an array
const result = items.map((item) => {
    return transform(item);
});
Use filter() when selecting items
const result = items.filter((item) => {
    return condition(item);
});
Use reduce() when combining values
const result = items.reduce((total, item) => {
    return total + item;
}, 0);
Understanding Loop Performance
For small arrays and normal web applications, you usually don't need to obsess over loop performance.
Readable code is often more important.
However, it is useful to understand what happens when loops are nested.
For example:
for (const user of users) {
    for (const product of products) {
        console.log(user, product);
    }
}
If you have 1,000 users and 1,000 products, the inner operation can run up to:
1,000 × 1,000 = 1,000,000times.
This doesn't mean nested loops are automatically bad. They are sometimes exactly what the problem requires.
But when working with large datasets, you should consider whether there is a more efficient way to solve the problem.
A Practical Shopping Cart Example
Let's put several concepts together.
Imagine a shopping cart:
const cart = [
    {
        name: "Laptop",
        price: 1200,
        quantity: 1
    },
    {
        name: "Keyboard",
        price: 80,
        quantity: 2
    },
    {
        name: "Mouse",
        price: 40,
        quantity: 1
    }
];
We can calculate the total:
let total = 0;

for (const item of cart) {
    total += item.price * item.quantity;
}

console.log(`Total: $${total}`);
Output:
Total: $1400This is a very realistic use of loops.
The same basic pattern can be used for invoices, orders, shopping carts, reports, and many other applications.
A Practical User Search Example
Suppose you have a list of users:
const users = [
    {
        id: 1,
        name: "Ahmed"
    },
    {
        id: 2,
        name: "Sara"
    },
    {
        id: 3,
        name: "Omar"
    }
];
You can search for a user by ID:
const userId = 2;

for (const user of users) {
    if (user.id === userId) {
        console.log("Found:", user);
        break;
    }
}
The loop checks each user until it finds the matching ID.
This kind of logic appears frequently in applications that work with users, products, orders, or other records.
Practice Exercises
Reading about loops is useful, but actually writing them is where the concept starts to stick.
Try these exercises yourself before looking for a solution.
Exercise 1: Print Numbers
Write a loop that prints numbers from 1 to 20.
Expected output:
1
2
3
...
20
Exercise 2: Print Even Numbers
Print all even numbers between 1 and 50.
A useful condition is:
number % 2 === 0Exercise 3: Calculate a Total
Given:
const prices = [10, 20, 30, 40, 50];Calculate the total using a loop.
Expected result:
150Exercise 4: Find a User
Given:
const users = [
    "Ahmed",
    "Sara",
    "Omar",
    "Youssef"
];
Use a loop to find "Omar".
Exercise 5: Create a Countdown
Write a loop that prints:
10
9
8
7
6
5
4
3
2
1
0
Exercise 6: Calculate an Average
Given:
const grades = [12, 15, 18, 14, 16];Use a loop to calculate the average.
Exercise 7: Find the Largest Number
Given:
const numbers = [12, 45, 7, 89, 23, 56];Use a loop to find the largest number.
These exercises may look simple, but they teach the exact patterns you'll later use in larger applications.
JavaScript Loops Cheat Sheet
Loop or Method | Typical Use |
|---|---|
| Repeat code with a counter |
| Repeat while a condition is true |
| Execute at least once, then check the condition |
| Iterate over values |
| Iterate over object property keys |
| Execute a function for every array item |
| Transform every array item |
| Select matching array items |
| Combine array values into one result |
Final Thoughts
Loops are one of the most important foundations of JavaScript.
At first, syntax like this may look a little strange:
for (let i = 0; i < 10; i++) {
    console.log(i);
}
But once you understand the three main parts — initialization, condition, and update — the pattern becomes much easier to read.
From there, you can learn while, do...while, for...of, for...in, and the many useful array methods such as forEach(), map(), filter(), and reduce().
Don't try to memorize every loop immediately.
Instead, experiment.
Change:
i++;to:
i += 2;Try counting backwards:
i--;Change the condition.
Loop through an array.
Try an object.
Intentionally create an infinite loop and then figure out why it happens.
That kind of hands-on practice is often much more valuable than simply reading the syntax.
Once loops become comfortable, you'll start seeing them everywhere in JavaScript: API responses, shopping carts, dashboards, forms, React components, data processing, and backend applications.
The key idea to remember is simple:
A loop lets you write a piece of logic once and execute it repeatedly.
Master that idea, practice the different loop types, and you'll have one of the fundamental JavaScript skills needed to build more complex applications.