
How to Add Google AdSense to a React Project

If you have built a React website and want to monetize it, Google AdSense is one of the most popular options available. AdSense allows website owners to display advertisements on their websites and earn revenue when visitors interact with those ads.
Adding AdSense to a React project is slightly different from adding it to a traditional HTML website. React applications are often built as single-page applications (SPAs), which means that pages can change without the browser performing a complete page reload. Because of this, you need to understand where the AdSense script should be loaded, how ad components should be created, and how advertisements should behave when React renders or updates a page.
In this guide, we will walk through the process of adding Google AdSense to a React project step by step. We will also look at common mistakes, reusable ad components, responsive advertisements, React Router, development considerations, and some practical recommendations that can make your integration cleaner.
If you are new to AdSense, don't worry. You do not need to be an advertising expert to follow this tutorial. If you already know the basics of React components, JSX, and npm, you should be able to integrate AdSense without too much difficulty.
The first thing to understand is that Google AdSense does not simply work by installing a React package. AdSense requires a JavaScript script to be loaded by your website, and individual advertisements are represented using HTML elements containing specific Google attributes.
For example, a traditional HTML AdSense implementation can look similar to this:
<script
  async
  src="https://pagead2.googlesyndication.com/pagead/js/adsbygoogle.js?client=ca-pub-XXXXXXXXXXXXXXXX"
  crossorigin="anonymous">
</script>

<ins
  class="adsbygoogle"
  style="display:block"
  data-ad-client="ca-pub-XXXXXXXXXXXXXXXX"
  data-ad-slot="1234567890"
  data-ad-format="auto"
  data-full-width-responsive="true">
</ins>

<script>
  (adsbygoogle = window.adsbygoogle || []).push({});
</script>
In React, however, JSX uses className instead of class, and it is usually better to separate the advertising logic into a reusable component.
Before writing React code, you need a Google AdSense account.
Visit the official Google AdSense website and sign in using your Google account. You will need to add your website and complete Google's verification and approval process.
Keep in mind that simply adding the AdSense script to a website does not guarantee that advertisements will immediately appear. Your website needs to comply with Google's policies, and Google needs to approve the website for AdSense.
This is an important point that many developers discover only after completing the technical integration.
You can have perfectly working React code and still see an empty advertisement area because the website has not yet been approved, there are no suitable ads available, the ad configuration is incorrect, or Google has not yet started serving ads.
Once your AdSense account and website are ready, you need to add the AdSense script to your React application.
If you are using a typical Vite React project, you will probably have an index.html file in the root of your project.
A simple Vite project may look like this:
my-react-app/
├── public/
├── src/
│   ├── components/
│   ├── pages/
│   ├── App.jsx
│   └── main.jsx
├── index.html
├── package.json
└── vite.config.js
Open your index.html file.
You can add the AdSense script inside the <head> section.
For example:
<!doctype html>
<html lang="en">
  <head>
    <meta charset="UTF-8" />

    <meta
      name="viewport"
      content="width=device-width, initial-scale=1.0"
    />

    <title>My React Website</title>

    <script
      async
      src="https://pagead2.googlesyndication.com/pagead/js/adsbygoogle.js?client=ca-pub-XXXXXXXXXXXXXXXX"
      crossorigin="anonymous">
    </script>
  </head>

  <body>
    <div id="root"></div>

    <script type="module" src="/src/main.jsx"></script>
  </body>
</html>
Replace:
ca-pub-XXXXXXXXXXXXXXXXwith your own AdSense publisher ID.
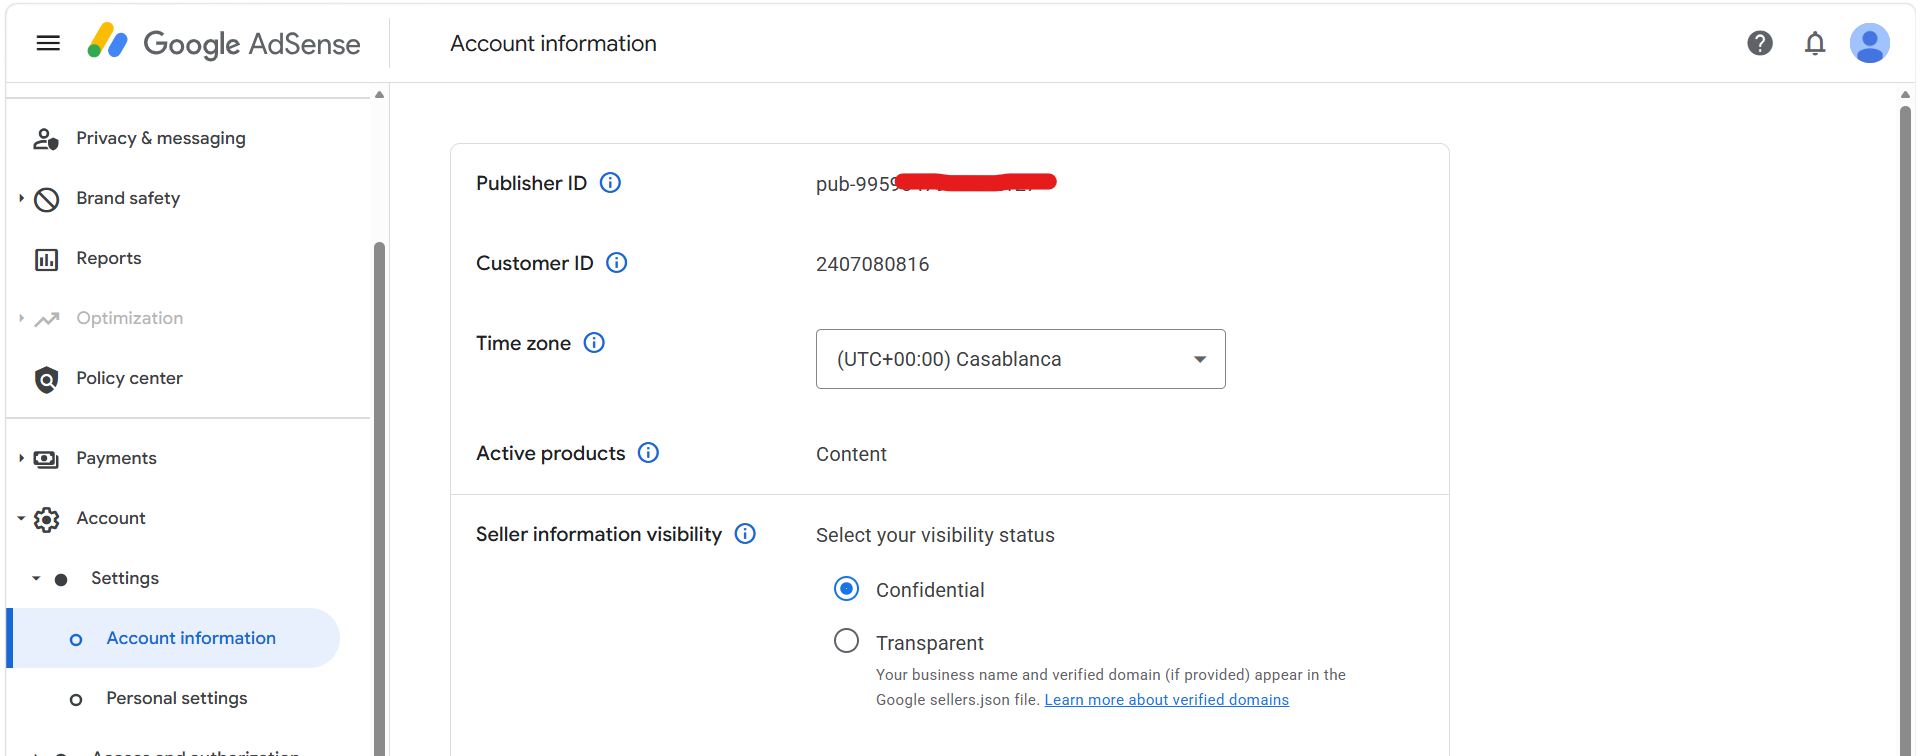
Your publisher ID will look similar to:
ca-pub-1234567890123456Do not copy the example ID from this article. You need to use the publisher ID associated with your own AdSense account.
Once the global script is loaded, you can create a React component for your advertisements.
A reusable component is a much better approach than manually copying the AdSense markup into every page.
For example, create:
src/components/AdSense.jsxThen add:
import { useEffect } from "react";

export default function AdSense({
  client,
  slot,
  format = "auto",
  responsive = true,
  style = {
    display: "block",
  },
}) {
  useEffect(() => {
    try {
      if (window.adsbygoogle) {
        window.adsbygoogle.push({});
      }
    } catch (error) {
      console.error("AdSense error:", error);
    }
  }, []);

  return (
    <ins
      className="adsbygoogle"
      style={style}
      data-ad-client={client}
      data-ad-slot={slot}
      data-ad-format={format}
      data-full-width-responsive={responsive ? "true" : "false"}
    />
  );
}
You can then use this component anywhere in your React application.
For example:
import AdSense from "./components/AdSense";

function Home() {
  return (
    <main>
      <h1>Welcome to my website</h1>

      <p>
        This is the content of my React website.
      </p>

      <AdSense
        client="ca-pub-XXXXXXXXXXXXXXXX"
        slot="1234567890"
      />
    </main>
  );
}

export default Home;
The advantage of this approach is that your AdSense configuration is encapsulated inside a reusable React component.
Instead of repeating the same logic throughout your application, you can simply write:
<AdSense
  client="ca-pub-XXXXXXXXXXXXXXXX"
  slot="1234567890"
/>
wherever you want an advertisement.
One thing worth mentioning is that React's rendering model is different from traditional static HTML.
When React renders a component, the <ins> element is created dynamically. Google AdSense needs to be notified that the advertisement container exists.
This is why we use:
useEffect(() => {
  window.adsbygoogle.push({});
}, []);
The useEffect hook runs after the component has been rendered.
That gives the browser an opportunity to create the advertisement element before the AdSense code attempts to process it.
A slightly safer implementation is:
import { useEffect } from "react";

export default function AdSense({
  client,
  slot,
}) {
  useEffect(() => {
    try {
      (window.adsbygoogle = window.adsbygoogle || []).push({});
    } catch (error) {
      console.error("AdSense failed:", error);
    }
  }, []);

  return (
    <ins
      className="adsbygoogle"
      style={{
        display: "block",
      }}
      data-ad-client={client}
      data-ad-slot={slot}
      data-ad-format="auto"
      data-full-width-responsive="true"
    />
  );
}
This version initializes window.adsbygoogle if it does not already exist.
You can also make the component even more flexible.
For example:
import { useEffect } from "react";

function AdSense({
  client,
  slot,
  format = "auto",
  responsive = true,
  style = {},
}) {
  useEffect(() => {
    try {
      (window.adsbygoogle = window.adsbygoogle || []).push({});
    } catch (error) {
      console.error("AdSense error:", error);
    }
  }, []);

  return (
    <ins
      className="adsbygoogle"
      style={{
        display: "block",
        ...style,
      }}
      data-ad-client={client}
      data-ad-slot={slot}
      data-ad-format={format}
      data-full-width-responsive={
        responsive ? "true" : "false"
      }
    />
  );
}

export default AdSense;
Now you can control the advertisement's style from the component.
For example:
<AdSense
  client="ca-pub-XXXXXXXXXXXXXXXX"
  slot="1234567890"
  style={{
    minHeight: "280px",
  }}
/>
You can also create different ad components for different locations on your website.
For example, you might have:
src/
├── components/
│   ├── AdSense.jsx
│   ├── HeaderAd.jsx
│   ├── ArticleAd.jsx
│   └── SidebarAd.jsx
Your article advertisement could be:
import AdSense from "./AdSense";

export default function ArticleAd() {
  return (
    <div className="article-ad">
      <AdSense
        client="ca-pub-XXXXXXXXXXXXXXXX"
        slot="1234567890"
      />
    </div>
  );
}
Then inside an article:
function Article() {
  return (
    <article>
      <h1>Learn React</h1>

      <p>
        React is a popular JavaScript library for building
        user interfaces.
      </p>

      <ArticleAd />

      <p>
        React applications are built from reusable components.
      </p>
    </article>
  );
}
This makes your application much easier to maintain.
Another important consideration is responsive design.
Modern websites are accessed from phones, tablets, laptops, and large desktop monitors. You generally do not want an advertisement to break your page layout on smaller screens.
For responsive advertisements, use:
<ins
  className="adsbygoogle"
  style={{
    display: "block",
  }}
  data-ad-client="ca-pub-XXXXXXXXXXXXXXXX"
  data-ad-slot="1234567890"
  data-ad-format="auto"
  data-full-width-responsive="true"
/>
The important attributes are:
data-ad-format="auto"and:
data-full-width-responsive="true"These allow the advertisement configuration to adapt to available space.
You can also wrap the advertisement in a container.
For example:
<div className="ad-container">
  <AdSense
    client="ca-pub-XXXXXXXXXXXXXXXX"
    slot="1234567890"
  />
</div>
With CSS:
.ad-container {
  width: 100%;
  max-width: 100%;
  margin: 2rem auto;
  overflow: hidden;
}
If you use Tailwind CSS, you could write:
<div className="w-full max-w-full overflow-hidden my-8">
  <AdSense
    client="ca-pub-XXXXXXXXXXXXXXXX"
    slot="1234567890"
  />
</div>
One common question is whether you need to install an npm package for Google AdSense.
In most cases, you do not need a third-party React package.
The official AdSense JavaScript script can be loaded directly, and React can render the required advertisement elements.
This approach has an additional advantage: fewer dependencies.
Your package.json does not need another library just to display an AdSense advertisement.
For example, you do not need to install something simply because your application uses React.
The integration can remain relatively lightweight.
Another important topic is React Router.
Suppose your website has routes such as:
/
 /blog
 /blog/react-tutorial
 /about
 /contact
React Router changes the displayed component without necessarily performing a complete browser page reload.
This means that your AdSense components may be mounted and unmounted as the user navigates through your application.
For example:
import { BrowserRouter, Routes, Route } from "react-router-dom";

import Home from "./pages/Home";
import Blog from "./pages/Blog";
import Article from "./pages/Article";

function App() {
  return (
    <BrowserRouter>
      <Routes>
        <Route path="/" element={<Home />} />
        <Route path="/blog" element={<Blog />} />
        <Route path="/blog/:slug" element={<Article />} />
      </Routes>
    </BrowserRouter>
  );
}

export default App;
If the article page contains:
<AdSense
  client="ca-pub-XXXXXXXXXXXXXXXX"
  slot="1234567890"
/>
the component will execute its useEffect when it mounts.
This is one reason the AdSense integration should be designed with React's lifecycle in mind rather than treating the application like a traditional multi-page HTML website.
However, there is an important issue to understand.
You should not repeatedly push the same advertisement element into the AdSense queue every time your component re-renders.
For that reason, the effect should normally be controlled so that it executes when the advertisement component is mounted.
For example:
useEffect(() => {
  try {
    (window.adsbygoogle = window.adsbygoogle || []).push({});
  } catch (error) {
    console.error(error);
  }
}, []);
The empty dependency array means the effect runs when the component mounts rather than after every ordinary render.
If you are using React Strict Mode during development, you may notice development-only behavior where effects are intentionally invoked more than once to help detect side effects.
This can sometimes make AdSense integration appear confusing during development.
For example, you may see an error such as:
adsbygoogle.push() error: All ins elements in the DOM with class=adsbygoogle already have ads in them.This does not necessarily mean your production application is broken.
React's development behavior and Google's advertisement processing can sometimes interact in ways that produce console warnings or errors.
One practical approach is to prevent duplicate initialization.
For example:
import { useEffect, useRef } from "react";

export default function AdSense({
  client,
  slot,
}) {
  const initialized = useRef(false);

  useEffect(() => {
    if (initialized.current) {
      return;
    }

    initialized.current = true;

    try {
      (window.adsbygoogle = window.adsbygoogle || []).push({});
    } catch (error) {
      console.error("AdSense error:", error);
    }
  }, []);

  return (
    <ins
      className="adsbygoogle"
      style={{
        display: "block",
      }}
      data-ad-client={client}
      data-ad-slot={slot}
      data-ad-format="auto"
      data-full-width-responsive="true"
    />
  );
}
This can help prevent duplicate initialization within the lifecycle of that component instance.
Another important point is that advertisements should not be the main reason for your website's existence.
This may sound obvious, but it is one of the biggest mistakes new website owners make.
Imagine visiting a programming tutorial website.
You want to read:
How to Build a REST API with DjangoBut before the article starts, there is an advertisement.
Then another advertisement appears between the introduction and the first code example.
Then another advertisement appears before the second paragraph.
Then the sidebar contains advertisements.
Then a sticky advertisement covers part of the screen.
At some point, the reader stops caring about the article and simply leaves.
As developers, it is easy to focus on monetization because seeing your first advertisement working feels exciting.
But a website is ultimately built for people.
A better approach is to think about the user experience first.
For a programming website, you might place an advertisement:
Header

Article introduction

Advertisement

Main content

Code example

Advertisement

More content

Conclusion
instead of placing ads after every few sentences.
The exact placement depends on your website, audience, content length, and Google's policies.
You should also make sure that advertisements do not interfere with your application's layout.
For example, avoid creating a situation where the page initially has zero height for an advertisement and then suddenly expands when an advertisement loads.
This can create layout shifts.
You can reserve some space using CSS when appropriate.
For example:
.ad-container {
  width: 100%;
  min-height: 100px;
  margin: 24px 0;
}
However, the exact height depends on the advertisement format you are using.
You should not blindly reserve a huge amount of empty space because that can make your website look broken when an advertisement is not served.
Another important subject is environment variables.
You may prefer not to hard-code your publisher ID throughout your React application.
With Vite, you can use an environment variable.
For example, create:
.envand add:
VITE_ADSENSE_CLIENT=ca-pub-XXXXXXXXXXXXXXXXThen inside your React component:
const client = import.meta.env.VITE_ADSENSE_CLIENT;Your component can then look like:
import { useEffect } from "react";

export default function AdSense({
  slot,
}) {
  const client = import.meta.env.VITE_ADSENSE_CLIENT;

  useEffect(() => {
    try {
      (window.adsbygoogle = window.adsbygoogle || []).push({});
    } catch (error) {
      console.error("AdSense error:", error);
    }
  }, []);

  return (
    <ins
      className="adsbygoogle"
      style={{
        display: "block",
      }}
      data-ad-client={client}
      data-ad-slot={slot}
      data-ad-format="auto"
      data-full-width-responsive="true"
    />
  );
}
One important clarification about environment variables in React applications is that they are not secrets.
A Vite variable beginning with:
VITE_is included in the client-side application bundle.
Therefore, you should never put private API keys, passwords, database credentials, or secret tokens into such variables.
An AdSense publisher ID is designed to be visible on your website, so it is not equivalent to a private secret.
For example, this is generally fine:
VITE_ADSENSE_CLIENT=ca-pub-XXXXXXXXXXXXXXXXBut this is not where you should store:
VITE_DATABASE_PASSWORD=secretor:
VITE_PRIVATE_API_KEY=secretbecause visitors can inspect the generated JavaScript application.
If you are using Create React App rather than Vite, the environment variable convention is different.
You might use:
REACT_APP_ADSENSE_CLIENT=ca-pub-XXXXXXXXXXXXXXXXand access it using:
process.env.REACT_APP_ADSENSE_CLIENTHowever, Vite is now a very common choice for modern React projects, so the VITE_ approach is often what you will encounter.
You should also consider how you handle development environments.
For example, your production website may be:
https://example.comwhile your local development application is:
http://localhost:5173You generally should not expect production advertising behavior to be identical on localhost.
Your development environment is mainly useful for checking that your React component renders correctly and does not break your layout.
You should also avoid repeatedly clicking your own advertisements to test them.
Artificially generating clicks or impressions can violate Google's policies and can put your account at risk.
Instead, test the technical integration by checking that the advertisement container renders correctly and that the AdSense script is loaded.
Your browser's Developer Tools can be useful here.
Open:
F12then go to the Network tab and look for requests related to AdSense.
You can also inspect the rendered HTML and confirm that your advertisement element exists.
For example:
<ins class="adsbygoogle">If the element exists but no advertisement appears, that does not automatically mean your React code is wrong.
There can be many reasons for an empty advertisement area.
For example:
Website not approved
Ad serving limitations
No suitable advertisement available
Incorrect publisher ID
Incorrect ad slot
Browser extensions
Ad blockers
Development environment
Policy-related restrictions
This distinction is important.
As developers, we naturally assume that an empty component means a programming bug.
With advertising systems, that is not always true.
Sometimes the React component is working perfectly and the advertising platform simply has not returned an advertisement.
Ad blockers are another common reason why you may not see advertisements during testing.
For example, if you have an ad-blocking browser extension installed, the AdSense script may be blocked.
Try testing your website in a clean browser profile without extensions when you need to determine whether the problem is caused by your browser.
You should also make sure that your website uses HTTPS in production.
A modern website should normally be served securely:
https://example.comrather than:
http://example.comHTTPS is important for security, user trust, and many modern web platform features.
If your React application is deployed to a hosting provider, make sure your domain is correctly configured and that HTTPS is working before expecting your production AdSense setup to behave normally.
Another consideration is Content Security Policy.
If your website uses a strict Content Security Policy, third-party advertising resources may require appropriate permissions.
For example, a restrictive CSP can prevent external scripts or frames from loading.
If you use CSP, make sure your configuration is compatible with the resources required by Google AdSense.
Do not simply disable your entire security policy without understanding the consequences.
Security and advertising need to coexist.
For websites using React Server-Side Rendering frameworks such as Next.js, the integration can be slightly different.
A standard React SPA and a Next.js application do not have exactly the same rendering model.
For a traditional React + Vite application, adding the AdSense script to index.html is straightforward.
For a framework such as Next.js, you may use the framework's script-loading mechanism instead.
The important concept remains the same:
Load the AdSense script
        ↓
Render an AdSense container
        ↓
Initialize the advertisement
        ↓
Allow Google to serve the ad
Another useful approach is to create a dedicated configuration file.
For example:
src/config/ads.jswith:
export const adsConfig = {
  client: "ca-pub-XXXXXXXXXXXXXXXX",

  slots: {
    header: "1111111111",
    article: "2222222222",
    sidebar: "3333333333",
    footer: "4444444444",
  },
};
Then your component can use:
import { useEffect } from "react";
import { adsConfig } from "../config/ads";

export default function ArticleAd() {
  useEffect(() => {
    try {
      (window.adsbygoogle = window.adsbygoogle || []).push({});
    } catch (error) {
      console.error(error);
    }
  }, []);

  return (
    <ins
      className="adsbygoogle"
      style={{
        display: "block",
      }}
      data-ad-client={adsConfig.client}
      data-ad-slot={adsConfig.slots.article}
      data-ad-format="auto"
      data-full-width-responsive="true"
    />
  );
}
This is particularly useful for larger applications.
Instead of searching through dozens of React files when an advertisement configuration changes, you can keep your configuration centralized.
For example:
export const adsConfig = {
  client: import.meta.env.VITE_ADSENSE_CLIENT,

  slots: {
    header: import.meta.env.VITE_ADSENSE_HEADER_SLOT,
    article: import.meta.env.VITE_ADSENSE_ARTICLE_SLOT,
    sidebar: import.meta.env.VITE_ADSENSE_SIDEBAR_SLOT,
  },
};
Your .env file could then contain:
VITE_ADSENSE_CLIENT=ca-pub-XXXXXXXXXXXXXXXX
VITE_ADSENSE_HEADER_SLOT=1111111111
VITE_ADSENSE_ARTICLE_SLOT=2222222222
VITE_ADSENSE_SIDEBAR_SLOT=3333333333
This makes the project cleaner.
You can also create a simple wrapper component that only renders an advertisement in production.
For example:
import { useEffect } from "react";

export default function AdSense({
  client,
  slot,
}) {
  useEffect(() => {
    if (import.meta.env.DEV) {
      return;
    }

    try {
      (window.adsbygoogle = window.adsbygoogle || []).push({});
    } catch (error) {
      console.error("AdSense error:", error);
    }
  }, []);

  if (import.meta.env.DEV) {
    return (
      <div
        style={{
          padding: "20px",
          textAlign: "center",
          background: "#f3f4f6",
          border: "1px dashed #9ca3af",
        }}
      >
        Advertisement
      </div>
    );
  }

  return (
    <ins
      className="adsbygoogle"
      style={{
        display: "block",
      }}
      data-ad-client={client}
      data-ad-slot={slot}
      data-ad-format="auto"
      data-full-width-responsive="true"
    />
  );
}
This gives you a visual placeholder during development.
It can be useful because you can immediately see where advertisements will appear without depending on Google to serve an advertisement.
For example:
------------------------------
|                            |
|       Advertisement        |
|                            |
------------------------------
Then in production, the placeholder becomes the real AdSense component.
Another good practice is to avoid putting advertisements inside interactive elements.
Do not place an advertisement inside a button, link, navigation element, or any component where a user could accidentally interact with the wrong element.
Keep advertisements visually separated from important interactive controls.
For example, this is a better structure:
<div>
  <Article />

  <div className="my-8">
    <AdSense
      client="ca-pub-XXXXXXXXXXXXXXXX"
      slot="1234567890"
    />
  </div>

  <RelatedArticles />
</div>
rather than placing advertisements directly inside clickable components.
You should also pay attention to accessibility and layout.
An advertisement should not cause your content to become unusable on small screens.
Test your website at several viewport sizes:
320px
375px
425px
768px
1024px
1440px
You can use Chrome DevTools to simulate mobile devices.
If an advertisement causes horizontal scrolling, investigate the container immediately.
For example, this can help:
.ad-container {
  width: 100%;
  max-width: 100%;
  overflow: hidden;
}
With Tailwind CSS:
<div className="w-full max-w-full overflow-hidden">
  <AdSense
    client="ca-pub-XXXXXXXXXXXXXXXX"
    slot="1234567890"
  />
</div>
Another common mistake is copying an AdSense snippet into JSX without converting HTML syntax correctly.
For example, HTML might use:
class="adsbygoogle"but JSX requires:
className="adsbygoogle"Likewise, JSX attributes generally follow JavaScript conventions.
This is one reason a reusable component is safer than manually pasting snippets throughout your application.
A complete basic React implementation can therefore look like this.
First, your index.html:
<!doctype html>
<html lang="en">
  <head>
    <meta charset="UTF-8" />

    <meta
      name="viewport"
      content="width=device-width, initial-scale=1.0"
    />

    <title>React AdSense Website</title>

    <script
      async
      src="https://pagead2.googlesyndication.com/pagead/js/adsbygoogle.js?client=ca-pub-XXXXXXXXXXXXXXXX"
      crossorigin="anonymous">
    </script>
  </head>

  <body>
    <div id="root"></div>

    <script type="module" src="/src/main.jsx"></script>
  </body>
</html>
Then:
src/components/AdSense.jsximport { useEffect } from "react";
export default function AdSense({
client,
slot,
}) {
useEffect(() => {
try {
(window.adsbygoogle = window.adsbygoogle || []).push({});
} catch (error) {
console.error("AdSense error:", error);
}
}, []);
return (
<div
style={{
width: "100%",
maxWidth: "100%",
overflow: "hidden",
}}
>
<ins
className="adsbygoogle"
style={{
display: "block",
}}
data-ad-client={client}
data-ad-slot={slot}
data-ad-format="auto"
data-full-width-responsive="true"
/>
</div>
);
}Then:
import AdSense from "./components/AdSense";

function App() {
  return (
    <main>
      <h1>My React Website</h1>

      <p>
        Welcome to my website.
      </p>

      <AdSense
        client="ca-pub-XXXXXXXXXXXXXXXX"
        slot="1234567890"
      />

      <article>
        <h2>Learn React</h2>

        <p>
          React makes it possible to build reusable user
          interface components.
        </p>
      </article>
    </main>
  );
}

export default App;
That is enough to establish the basic technical integration.
But successful monetization requires more than simply adding the code.
Your website needs useful content.
If you are building a programming website, for example, focus on tutorials that solve real problems.
Instead of writing an article just because you want another page containing advertisements, write something that a developer might actually search for.
For example:
How to Fix CORS Errors in React
How to Connect React to a Django REST API
How to Build Authentication with Laravel and React
How to Upload Images in React
How to Create a REST API with Node.js
How to Deploy a React Application
How to Optimize React Performance
These topics provide value before monetization even enters the discussion.
A website that provides genuinely useful information has a much better foundation than a website created primarily to display advertisements.
You should also pay attention to page speed.
Loading unnecessary JavaScript, huge images, multiple advertising scripts, and poorly optimized components can make a website slower.
React applications already have a JavaScript bundle, so it is worth keeping the application optimized.
Use techniques such as:
Code splitting
Lazy loading
Image optimization
Caching
Minification
Compression
Efficient React components
Do not add unnecessary third-party packages just to solve a problem that can be handled with a small React component.
AdSense itself adds external resources, so you should consider its impact when optimizing your site's overall performance.
Another important topic is privacy.
Depending on where your visitors are located, your website may have legal and regulatory obligations related to cookies, consent, privacy, and personalized advertising.
Google provides tools and documentation for handling consent and privacy requirements.
You should not assume that adding AdSense automatically handles every privacy obligation for your particular website.
If you have visitors from different countries, especially regions with strict privacy regulations, make sure your privacy and consent setup is appropriate for your audience and advertising configuration.
You should also create a clear privacy policy for your website.
A professional website commonly includes pages such as:
Privacy Policy
Terms of Service
Cookie Policy
Contact
About
These pages also make your website feel more trustworthy to visitors.
One of the biggest lessons when adding AdSense to a React website is that the code is actually the easy part.
The difficult part is building a website that people want to visit.
Adding:
<AdSense />takes only a few minutes.
Building a website with hundreds of useful pages, good navigation, fast loading times, original content, and returning visitors can take months.
That is completely normal.
If you are just starting, focus on building the website first.
Create useful content.
Improve the design.
Fix technical problems.
Make your navigation intuitive.
Make the website work well on mobile devices.
Then integrate monetization carefully.
When your React application is ready for production, build it using your normal production command.
For a Vite React application:
npm run buildYou will normally get a production build inside:
dist/You can then deploy that build to your hosting provider.
After deployment, verify the production website rather than relying exclusively on localhost.
Check:
HTTPS
Domain configuration
AdSense script
Publisher ID
Ad slots
Mobile layout
Desktop layout
Browser console
Network requests
Privacy configuration
Page performance
If you see an empty advertisement after deployment, do not immediately rewrite your React component.
First check whether:
The AdSense account is approved
The website is approved
The publisher ID is correct
The ad slot is correct
An ad blocker is active
The browser console contains errors
The website is using HTTPS
Google is currently serving an ad
This simple checklist can save a lot of unnecessary debugging.
Finally, remember that Google AdSense policies can change.
The technical React integration described here explains how the code can be structured, but you should always check Google's current documentation and policies before deploying advertisements to a production website.
The most important idea is simple: treat advertisements as a part of your website, not the entire website.
A good React application should still be useful if you temporarily remove every advertisement.
If users come to your website because the content is helpful, the design is clean, and the experience is good, advertising can become a natural way to monetize that traffic.
If users come only to see advertisements, there is no sustainable foundation.
React makes it relatively easy to create reusable advertisement components. Once the AdSense script is loaded, a small component using useEffect() and an <ins className="adsbygoogle"> element can be reused throughout your application.
A clean project structure might ultimately look like this:
src/
├── components/
│   ├── AdSense.jsx
│   ├── Header.jsx
│   ├── Footer.jsx
│   └── Navbar.jsx
│
├── pages/
│   ├── Home.jsx
│   ├── Blog.jsx
│   ├── Article.jsx
│   └── About.jsx
│
├── config/
│   └── ads.js
│
├── App.jsx
└── main.jsx

index.html
.env
package.json
vite.config.js
And your advertisement component remains simple:
import { useEffect } from "react";

export default function AdSense({
  client,
  slot,
}) {
  useEffect(() => {
    try {
      (window.adsbygoogle = window.adsbygoogle || []).push({});
    } catch (error) {
      console.error("AdSense error:", error);
    }
  }, []);

  return (
    <div className="w-full max-w-full overflow-hidden">
      <ins
        className="adsbygoogle"
        style={{
          display: "block",
        }}
        data-ad-client={client}
        data-ad-slot={slot}
        data-ad-format="auto"
        data-full-width-responsive="true"
      />
    </div>
  );
}
Then anywhere in your application:
<AdSense
  client="ca-pub-XXXXXXXXXXXXXXXX"
  slot="1234567890"
/>
And that's the core of adding Google AdSense to a React project.
The technology is relatively straightforward. The real challenge—and the part that makes the difference—is creating something worth coming back to.
Build the content first, keep the user experience clean, follow Google's policies, test the integration carefully, and treat monetization as one part of the project rather than the whole project.